InDesign Basics: Creating your First Document
In this Bitesize tutorial, you will learn how to create a New Document in InDesign, and how to save reusable Custom Page Sizes for print and web design.
-
Learn how to create a New Document in InDesign
-
Become familiar with the New Document Window
-
Set Margins and Columns
-
Understand Bleed and Slug
-
Create Custom Page Sizes
Step 1: Overview of the New Document Window
Let’s get started. Open InDesign. From the Welcome Window, select Document from the Create New list.

The New Document Window opens on screen. This image shows everything you need to address before clicking that OK button…

There’s quite a lot going on here, but it’s really important that you set all your values correctly before creating your Document. It will be much more fiddly to make changes afterwards.
Let’s break it down bit by bit…
Step 2: Set the Intent of your Document
The first thing to tell InDesign is what your final document is intended for, i.e. is it for Print (e.g. a magazine, book, brochure, poster etc), Web (e.g. a website banner) or for Digital Publishing (e.g. a digital eBook designed for tablets or smart devices)? InDesign will be prompted to bring up recommended Page Sizes depending on your choice, and also set the Units and Increments of your document (e.g. Millimeters for Print, or Pixels for Web/Digital).
 Click once on the default ‘Print’ value next to Intent to bring up a drop-down menu. Click on the three different Intent options and see how the rest of the New Document Window adapts accordingly. If you keep ‘Print’ as your Intent, you are offered a number of pre-loaded, standard Page Sizes in the drop-down Page Size Menu, and all Units will be in Millimeters.
 You can see that InDesign has some preloaded Page Sizes ready to use, such as US Business Card, Letter, as well as European A5, A4, A3 etc. You can choose a preloaded size or create a Custom Page Size. Let’s keep the Intent as Print, and create a Custom Size for a paperback Book as an example…
Step 3: Set the Page Size of your Document
From the Page Size drop-down menu select Custom… (the last option) to open the Custom Page Size window.
You can set the Width and Height of each Page in your document and give the Custom Size a Name by typing in the bar at the top of the window. For example, for a standard European Paperback Book, you would set the values to Width, 132 mm and Height, 197 mm. Name your Custom Size, ‘Paperback Book’ and Click OK.


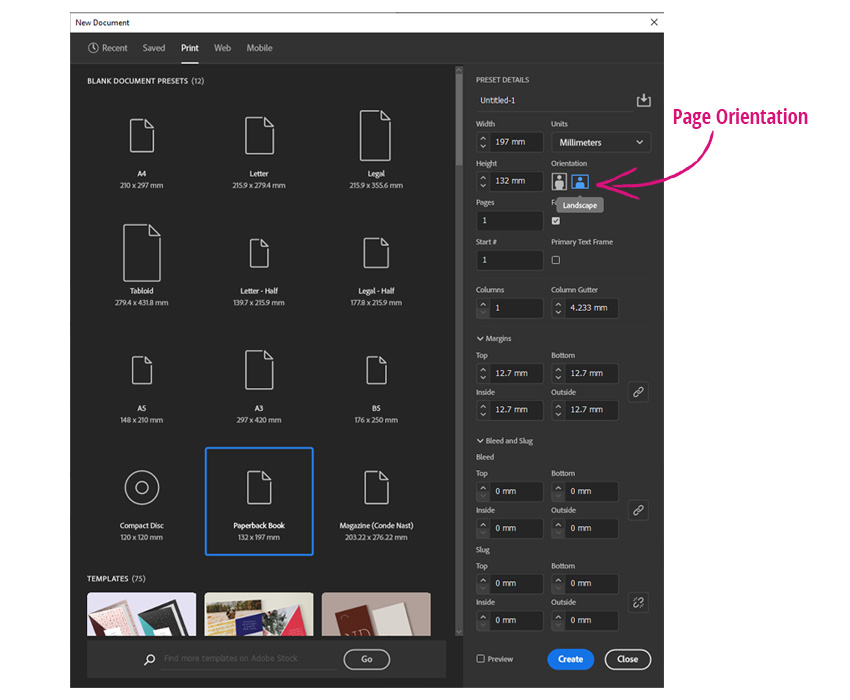
You may find back in the New Document window that InDesign has switched the Orientation of your document from Portrait to Landscape. Ensure the correct Orientation is selected by clicking the left-hand Portrait icon.
 Next, you want to make sure the Facing Pages check-box is selected. If you’re creating a book, magazine or booklet, you will want to be able to view spreads (of two facing pages) while you design. When you check Facing Pages, your Document will always start on a Right-Hand single page.
If you’re creating a single-page document (e.g. a Letter or Resume), or a document which will be printed on one single ream of paper stock (e.g. a Business Card, a Folding Brochure [with no spine, unlike a Booklet], or a Book Cover), you should uncheck the Facing Pages box.
For this Book example, keep Facing Pages checked.

Step 4: Define Margins for your Document
Setting accurate Margins is a very important task before creating your Document. Adequate Margins will give your final document a professional look, and also, in the case of books in particular, ensure that text or images don’t disappear into the binding at the spine. These are recommended Margin measurements for a Paperback Book.
NOTICE that the Inside Value (i.e. the edge of the Page that sits against the spine of the Book) is Wider than the Outside Value. This allows extra white space where the page will be sucked into the binding or the folds of the book. If you’re producing a Booklet (which also has a spine, but may be bound using a Lay-Flat binding technique) you should do the same, but the Inside Margin doesn’t need to be as wide, just add 2-3 extra millimeters.
Set the Margin values to:
Top: 22.3 mm
Bottom: 22.3 mm
Inside: 19.05 mm (As this is a Book, add on an extra 5-6 mm to your Outside Margin)
Outside: 12.7 mm

Step 5: Define Columns for your Document
To help develop a uniform Grid throughout your Document, you should set the Number of Columns and the Gutter value (the space between Columns). Setting Columns does not restrict where you can place text or images, but simply provides visual guidelines.
Columns are the backbone of a number of print documents, the most obvious being a Newspaper format. Keep in mind that for some documents, such as newspapers, newsletters or magazines, you will need to set 2-3 columns in the New Document Window. This will then be applied uniformly across all the Pages and Masters in your document.
For a paperback Book, you may not want to introduce Columns as the area for text is already restricted. So, for now, leave the default Column value at 1.

Step 6: Set the Bleed for your Document
So, first a common and really important question – WHAT IS A BLEED??
A Bleed is an essential setting for Print documents (you don’t need to set one for Web or Digital Publishing).
A Bleed is a small amount of space extending beyond the very edge of the Document. When a Document is printed, it is then Trimmed, or cut along the edge of the Document. There may be a small error in the accuracy of the Trim (printers are human too, after all!). If you have not set a Bleed area, and you have created, for example, a document with color that extends to the edges of the Trim, you may see an unwanted white edge along the perimeter of the card.
You can use the Bleed to extend this color across the Trim, so when it’s cut, whatever the margin of error, you will have a seamless all-color edge.

If you are producing a document which will have elements (text, images or color) that extend up to the edges of the document, at any point in the document, you should include a Bleed.
For a Book, you can set a 3 mm Bleed (or ask your Printer for their recommended Bleed Width), on the Top, Bottom and Outside edges. As the Inside Trim edge will not normally be visible, due to being sucked into the binding of the book, you can set the Inside value at 0 mm. This also prevents a Bleed appearing in the final PDF on the Inside edge, which could overlap with the page on an opposite spread, creating an ugly look, and a very confused (and angry) Printer!
Click the Chain icon to the right of the Bleed options to allow you to set different Bleed values.
In your document this is how it will look:
 For now, remain in the New Document Window. We’re going to take a look at that other confusing term, the Slug…
Step 7: Set the Slug for your Document
A second very common question – WHAT IS THE SLUG??
While a Bleed is ESSENTIAL for a print document, a Slug is not. But it can be useful.
A Slug, like a Bleed, does not appear on your final printed Document. It is simply a useful area to place information which might be required by an Editor, or a Printer. This might be the date of when the draft InDesign file was created, or the name of the creator etc.
I often find it easiest to place a single Slug area below the Bottom of the Document. So, for now, ‘break’ the chain icon to the right of the Slug values and set the Bottom value to 10 mm.

Step 8: Set the Number of Pages in your Document
Now, all you need to do is decide how many Pages your document will have. You may have a firm idea of this before you even start inserting text and images. But you may have no idea! That’s absolutely fine, you can easily add new Pages to your Document as you work on it. So for now, type in an estimate of the number and leave it at that.
Click OK.
And ta-dah! Your Document is ready for working on.
Explore further how to create a Book here…
