Quick Tip: How to Fix Overset Text in InDesign
If you’re seeing a little ‘+’ symbol at the bottom of a text frame, or getting an error warning when you come to export your InDesign file, you may need to fix an overset text problem.
Here, we’ll look at some quick and effective tips for fixing overset text, making your documents error-free in no time.
1. I have an error, is it overset text?

The problem: “I have a red ‘error’ flagged up; but how do I know it’s overset text?”
The solution: Identify the root cause in the Preflight panel
You may have noticed a small red circle at the bottom-left of the InDesign workspace, next to ‘x errors’ text. When you go to File > Export an InDesign document, InDesign will also alert you at this point if there are any errors in your document that require attention before exporting.
Errors come in various forms—from missing font files to missing image links—but one of the most common errors you will come across is overset text.
Usually, this is because you’ve been happily occupied tweaking font sizes and leading, without realising that a couple of lines of text have slipped beyond the edge of the final text frame. In more extreme cases, you could have pages of unwanted overset text brought in from a placed Word file, or simply a case of Edit > Paste clicked one too many times.
But there’s no need for tears. Overset text is easy to fix. It all starts with identifying it as the problem in the first place.
Click on the red ‘error’ circle at the bottom of the workspace to open the Preflight panel (or go to Window > Output > Preflight).
In the panel that opens, you’ll be able to see areas of errors capitalised, in the case of overset text this will be ‘TEXT’. Click on the arrow symbol to the left of ‘TEXT’ to expand the error.
Expanding each ‘Overset text’ in turn will reveal the source of the error, i.e. ‘Text Frame’, with a page reference highlighted in blue to the right.
Click on the page number to bring up the culprit on screen.
Now we’ve located the overset text, you can fix it quickly and easily. Read on to find out how…
2. How to find the overset text
The problem: “I can’t see the overset text!”
The solution: View ‘invisible’ overset text

Sometimes it’s difficult to know whether you’re dealing with a single paragraph of overset text or several pages.
To make the overset text visible, place your cursor in the text frame and go to Edit > Edit in Story Editor.
And voila! All the overset text is marked by a red line.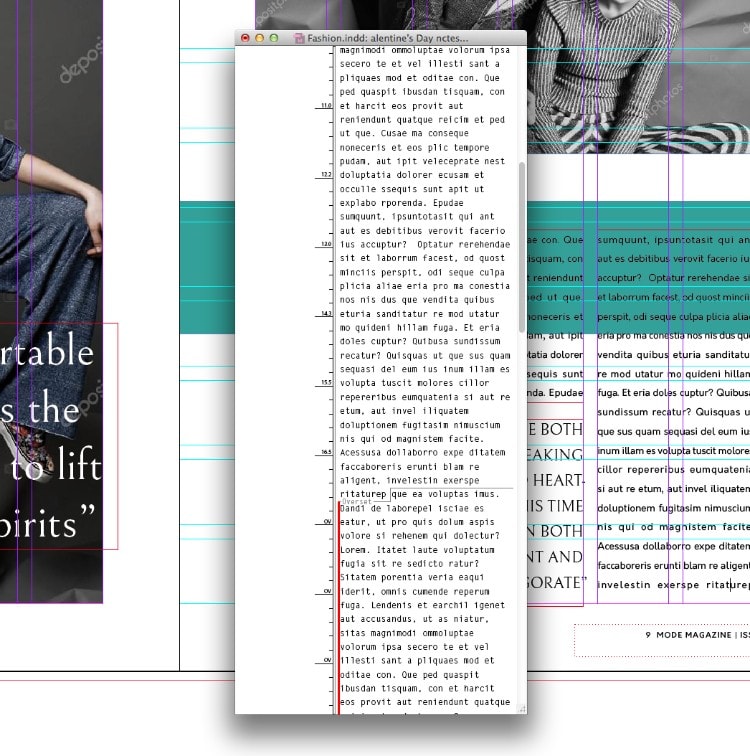
From here, you can edit the overset text, highlight it, Copy or Cut it, or Delete it.
3. How to fix overset text
The problem: “I can’t get rid of all this excess text”
The solution: Ctrl+Shift+End
Manually highlighting text in the Story Editor and deleting it from here is a good solution for removing small amounts of overset text. But what if you’re dealing with pages upon pages of unwanted text?
This is where a simple keyboard shortcut comes in handy. First, place your text cursor at the end of the text you want to keep. Then:
(Windows) Ctrl + Shift + End to select all overset text, then hit Delete to remove it
(Mac) Cmd + Shift + fn + Right-arrow to select all overset text, then hit Delete to remove it
Problem sorted! Now you can get on with exporting your document, and generally get on with your day.